Quick Start
Sample Prerequisites
Before starting with NWH Vehicle Physics 2, import the required samples:
Important
NWH Common Package > Common Base Sample must be imported first. This sample is required for all NWH package samples to function properly.
Samples are imported via Package Manager > In Project > NWH Vehicle Physics 2 > Samples.
Note
Samples are found in the Package Manager under the "In Project" category in the left sidebar, NOT under "My Assets" or other categories.
The Base Sample contains the main demo scene and is required before importing other Vehicle Physics samples (Mobile, Multiplayer, etc.).
Vehicle Model Requirements
Warning: Ensure that your vehicle model has the appropriate Unity rotation and pivot points. The model should use the following axes: Z - Forward, Y - Up, and X - Right. If your model has incorrect rotation and/or pivot points, consult this guide.

Warning: Maintain a vehicle scale of [1,1,1]. Adjust the vehicle scale using the model import settings in Unity or 3D software prior to vehicle setup.
Physics Settings
- Fixed Timestep: Recommended 0.01667 (60Hz) for desktop, 0.0333 (30Hz) for mobile. Higher rates like 0.01 (100Hz) or 0.00833 (120Hz) provide smoother physics at higher computational cost.
- Solver Iterations: Minimum 12 velocity, 8 position iterations for stable physics.
- All NWH assets use SI units only (kg, m, N, Nm).
Warning: If making an open-world game with a large-scale map (> ~4000 units), the shifting origin is required (not only for this asset, but in general with game engines that use floating point precision). Explanation.
Automatic Setup
Vehicle Setup Wizard
To set up a vehicle automatically, use the
VehicleSetupWizard. Ensure that your vehicle has correct pivots and rotation
first. Then, attach the
VehicleSetupWizard to the root object of the vehicle—where the
Rigidbody would typically be placed. Follow the steps from the wizard
inspector. The VehicleSetupWizard logs all actions, errors, and
warnings in the console. Review and correct these manually if necessary.
Depending on the settings, you might need to set up the input manually:
Input Setup page
Manual Setup
Rigidbody
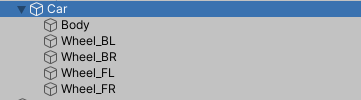
Add a Rigidbody component to the vehicle root, Car in the image
above. Set the mass to a reasonable value, e.g., 1400.
Colliders
Add a Collider (BoxCollider, MeshCollider, etc.) to the vehicle.
Rigidbody requires a collider to function properly.
Variable Center of Mass
Add the VariableCenterOfMass component to the vehicle root. Recommended but optional - center of mass and inertia significantly impact handling. Unity 6000 allows direct adjustment of center of mass and inertia tensor on the Rigidbody.
WheelController3D
NWH Vehicle Physics uses the included WheelController3D package - a complete replacement for Unity's WheelCollider with 3D ground detection, Pacejka friction model, and ARB system. See the WheelController Setup page for details.
- Create a suspension anchor object above the wheel center (duplicate wheel object, remove all components except Transform, move upward).
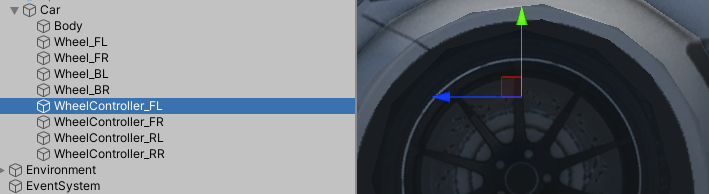
- Add
WheelControllercomponent to suspension anchor objects. Auto-initializes with default values. Verify:Parent- vehicle root with RigidbodyVisual- wheel mesh object
- Enable Gizmos, adjust
WidthandRadiusto match wheel model.
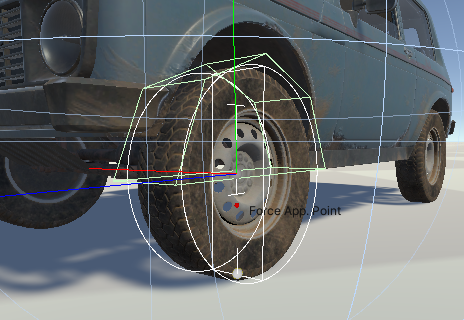
- Press play to test suspension. If vehicle jitters or jumps, verify Rigidbody mass and collider presence. See WheelController Setup troubleshooting section.
Input
Add to any scene object (e.g., SceneManager):
InputSystem (Unity's new input):
InputSystemVehicleInputProviderInputSystemSceneInputProvider
InputManager (legacy):
InputManagerVehicleInputProviderInputManagerSceneInputProvider
Rewired integration and custom input sources available. See Input Setup for details.
Cameras
- Create Cameras GameObject as child of vehicle, add CameraChanger.
- Add Camera child with CameraMouseDrag, set vehicle as
Target. - Any camera works (Cinemachine compatible).
VehicleController
- Add
VehicleControllerto vehicle root (where Rigidbody is). - Auto-initializes Differentials, Wheels, and WheelGroups. Check console output.
- Settings tab: Click
Validate Setupfor automatic validity check. - Press play. Vehicle functional but requires input provider for user control.
Assembly Definitions
This asset uses Assembly Definition (.asmdef) files.
If project uses assembly definitions:
- Add reference to required NWH assembly (e.g.,
NWH.VehiclePhysics2.VehicleController) in your project's .asmdef file.
If project does NOT use assembly definitions:
- Remove all .asmdef files from the asset after import.
Third-party SDKs without assembly definitions require either adding .asmdef to the SDK directory or removing all .asmdef files from NWH packages.
Video Tutorials
These videos have been created by Game Dev Project and are not official tutorials but they might help with the setup. Reading the documentation is still highly recommended.
Getting started with NWH Vehicle Physics 2 - Unity Asset Tutorial Model to Driveable in Under 60 Seconds - NWH Vehicle Physics 2 for Unity