Quick Start
Setting up an aircraft with NWH Aerodynamics.
Note: Import and examine demo scenes for quickest start. This guide covers manual setup.
Samples can be imported from the Samples tab in the Package Manager under In Project (left sidebar) > NWH Aerodynamics > Samples
Aircraft Model Requirements
Warning: Ensure your aircraft model has Unity-correct rotation and pivot points. The model should use Z - Forward, Y - Up, and X - Right axes. If your model has incorrect rotation and/or pivot points, you may need to adjust it in your 3D software before importing.
Warning: Maintain an aircraft scale of [1,1,1]. Adjust the scale using model import settings in Unity or 3D software prior to setup.
Model Structure: Ideally, your aircraft model should have separated meshes for:
- Fuselage
- Wings (left and right)
- Horizontal stabilizers/tail planes
- Vertical stabilizer/rudder
- Control surfaces (ailerons, elevators, rudder, flaps)
- Landing gear wheels
- Propellers (if applicable)
Physics Settings
- Set
Fixed Timestep(Edit > Project Settings > Time) to 0.01 (100Hz) or lower. Higher speeds need lower timestep for stable control surfaces. - Uses SI units (kg, m, N).
Warning: Large maps (> ~4000 units) require floating origin. See this floating origin guide for implementation details.
Manual Setup
No automatic setup wizard. Follow these steps to create a flyable aircraft.
Step 1: Rigidbody
- Add your aircraft model to the scene
- Add a
Rigidbodycomponent to the aircraft root object - Set the mass to a realistic value (e.g., 1200 for light aircraft like Cessna 172, 5000+ for jets)
- Disable
Use Gravitytemporarily during setup to prevent the aircraft from falling - Add colliders to the aircraft body (use primitive colliders or a simplified mesh collider)
Step 2: AircraftController
- Add
AircraftControllercomponent to the aircraft root (where the Rigidbody is) - The AircraftController will automatically add required child components:
AircraftInputManager- handles user inputAircraftFuelManager- manages fuel consumption- Other optional components can be added via the Components tab
Step 3: Airfoils (Wings and Stabilizers)
Lifting surfaces that generate aerodynamic forces. Typical setup:
- 2x Wings (left and right)
- 2x Horizontal stabilizers/tail planes (left and right)
- 1x Vertical stabilizer/fin
For each wing/stabilizer GameObject:
- Add
Airfoilcomponent to the wing GameObject - The Airfoil will attempt to auto-fit to your mesh
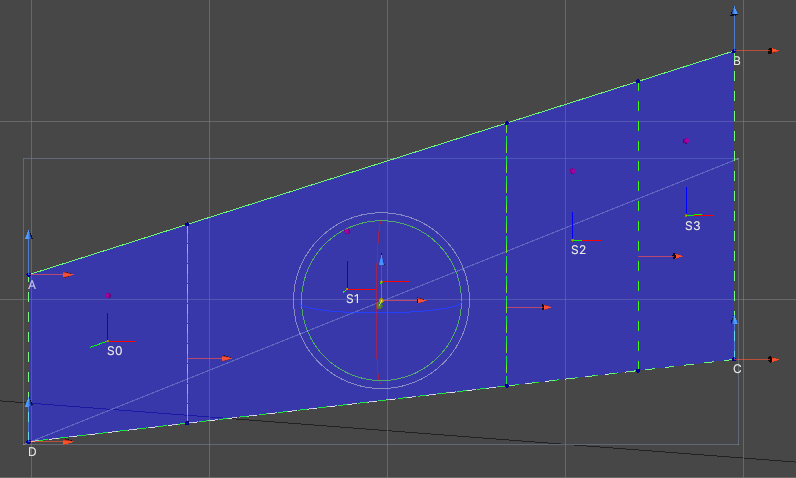
- Verify the airfoil shape matches your wing using the ABCD corner handles (blue-red movement handles)
- Check that
AirfoilSectionorientations are correct:- Blue (forward) should point toward incoming air
- Red (right) should align with the wing span
- Green (up) should point up from the wing surface
- If green points down, click the Flip button
- Adjust slicing planes (red dashed lines) if needed - more sections = higher accuracy but more cost
- Press Slice to generate sections
- Assign an
AirfoilProfile(default profiles are provided in Resources)
Mirroring: For symmetrical surfaces (left/right wings), set up one side completely, then:
- Assign the opposite wing GameObject to
Mirroring Target - Press Mirror to copy the setup
Step 4: Control Surfaces
Movable airfoils attached to fixed surfaces:
- Ailerons: Wings, control roll
- Elevators: Horizontal stabilizers, control pitch
- Rudder: Vertical stabilizer, controls yaw
- Flaps: Wings, increase lift/drag for takeoff/landing
For each control surface (example: aileron):
- Select the aileron GameObject (separate from the wing mesh)
- Add
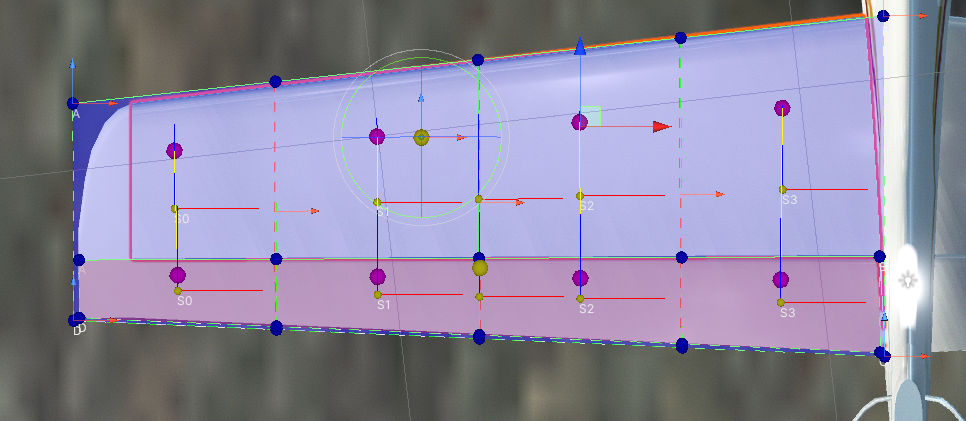
Airfoilcomponent and tickIs Control Surface - The airfoil gizmo will turn red
- Add the appropriate control surface component:
AileronControlSurfacefor aileronsElevatorControlSurfacefor elevatorsRudderControlSurfacefor rudderFlapControlSurfacefor flaps
- Adjust the deflection range (e.g., ±25° for ailerons)
- Select the parent wing/stabilizer airfoil
- At the bottom of the parent airfoil inspector, add the control surface to the list
- Adjust parent airfoil slicing planes to align with control surface edges (use red arrow handles)
- Yellow line gizmos indicate paired sections between parent and control surface
Step 5: Landing Gear
For each landing gear wheel:
- Create a
WheelColliderfollowing Unity's official WheelCollider guide - Position the WheelCollider at the wheel location
- Add
LandingGearcomponent to a parent GameObject (or directly on the WheelCollider object) - Assign fields:
WheelCollider- the Unity WheelCollider componentWheel- the visual wheel model TransformPosition- wheel location (Front, Left, Right, etc.)maxSteerAngle- steering angle for nose wheel (e.g., 45°), 0 for non-steerable wheels
- Configure
WheelColliderfriction:- Forward/Sideways Friction > Stiffness: 1.0-2.0 for wheels
- Adjust spring/damper to suit aircraft weight
Optional rigging and retractable gear: See LandingGear documentation for advanced setup.
Step 6: Propulsion
Aircraft need an engine and a propulsor (propeller or jet) for thrust.
Engine Setup:
- Create an empty GameObject under the aircraft (e.g., "Engine")
- Add an engine component:
PistonEngine- for propeller aircraft (Cessna, Piper, etc.)TurbineEngine- for jets and turboprops
- Configure engine parameters:
Max Power- maximum power output (e.g., 120000W for Cessna 172)Max RPM- maximum engine RPM (e.g., 2700 for piston engines, 30000+ for turbines)Stall RPM- idle RPM below which engine stalls (e.g., 600)Inertia- higher = slower to spin up (e.g., 0.5 for pistons, 5.0+ for jets)
Propulsor Setup:
- Create an empty GameObject for the propulsor (e.g., "Propeller" or "Jet")
- Add a propulsor component:
PropellerPropulsor- for propeller-driven aircraftJetPropulsor- for jet engines
- Configure propulsor:
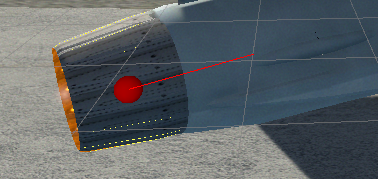
Thrust Point- where thrust is applied (move the GameObject to position this)Thrust Direction- forward direction (usually Z-axis of the GameObject)Inertia- propeller/turbine spinning inertia (e.g., 0.5)- For
PropellerPropulsor: SetbladeCount,bladeWidth,diameter,airfoilProfile - For
JetPropulsor: SetmaxThrustin Newtons (e.g., 50000N)
- Link engine to propulsor:
- Select the engine component
- In
Propulsion > Propulsors, add the propulsor component
Step 7: Center of Mass
Critical for stable flight:
- Add
VariableCenterOfMasscomponent to aircraft root - Position slightly forward of wing center (10-30% of wing chord)
- Typical inertia for light aircraft: [2000, 5000, 7000]
- Too far forward = nose-heavy
- Too far back = tail-heavy, unstable
Note: For Unity 2023 and newer, you can adjust center of mass directly on the Rigidbody component instead of using VariableCenterOfMass.
Step 8: Input
NWH Aerodynamics uses the AircraftInputManager which is automatically added when you add AircraftController.
Default controls:
- Pitch: W/S or Arrow Up/Down
- Roll: A/D or Arrow Left/Right
- Yaw: Q/E
- Throttle: Left Shift / Left Ctrl
- Brakes: B or Space
To customize input:
- Select the GameObject with
AircraftInputManager - The input manager uses InputSystem
- Assign input actions to customize controls
See Input documentation for detailed input setup.
Step 9: Test Flight
- Re-enable
Use Gravityon the Rigidbody - Position the aircraft on the ground or slightly above it
- Press Play
- Increase throttle (Left Shift)
- Steer with nose wheel (A/D) if on the ground
- Pull back on pitch (S) to take off
- Control the aircraft with pitch/roll/yaw inputs
If the aircraft doesn't fly:
- Check that all airfoils are sliced and have AirfoilProfiles assigned
- Verify control surfaces are attached to parent airfoils
- Ensure engine is linked to propulsor
- Check center of mass is not too far back
- Increase throttle to maximum for testing
- Verify Fixed Timestep is set to 0.01 or lower
Fine-Tuning
Stability
- Aircraft pitches up uncontrollably: Center of mass too far back, move it forward
- Aircraft pitches down: Center of mass too far forward, move it back
- Aircraft rolls/yaws unexpectedly: Check control surface deflections are not inverted
- Jittery controls at high speed: Reduce Fixed Timestep to 0.005 (200Hz)
Performance
- Not enough lift: Increase wing area, add more airfoil sections, or use higher-lift AirfoilProfile
- Not enough thrust: Increase engine Max Power or propulsor thrust
- Stalls easily: Ensure wings have sufficient area and appropriate AirfoilProfile (higher lift coefficient)
Control Surfaces
- Too sensitive: Reduce control surface deflection range (e.g., ±15° instead of ±25°)
- Not responsive enough: Increase deflection range or increase control surface area
Assembly Definitions
Uses .asmdef files.
- With assembly definitions: Add reference to
NWH.Aerodynamics.AircraftControllerin your .asmdef - Without assembly definitions: Remove all .asmdef files after import
Next Steps
- Study demo scenes (Package Manager > NWH Aerodynamics > Samples)
- Read component docs: Airfoil, Control Surfaces, Propulsion, AircraftController
- Add effects: Exhaust smoke, jet effects, lights
- Add instruments: HUD elements
- Configure sounds
Common Issues
- Falls through terrain: Check WheelColliders, terrain collider, starting position
- Control surfaces don't move: Verify components attached, AircraftInputManager present, surfaces added to parent airfoil list, input bindings configured
- Engine doesn't start: Increase throttle, check engine-propulsor link, verify Stall RPM, try disabling stalling
- Flips on takeoff: Center of mass too high/far back, landing gear too narrow, excessive engine torque