Quick Start
This guide covers setting up Wheel Controller 3D for wheel simulation with realistic suspension and friction physics.
Info: Wheel Controller 3D can be used standalone with the included CarController, or as part of NWH Vehicle Physics. If you're setting up a full vehicle with NWH Vehicle Physics, see the Vehicle Physics Quick Start instead.
Samples can be imported from the Samples tab in the Package Manager under In Project (left sidebar) > Wheel Controller 3D > Samples
Model Requirements
Warning: Ensure your vehicle model has Unity-correct rotation and pivot points. The model should use Z - Forward, Y - Up, and X - Right axes. If your model has incorrect rotation and/or pivot points, consult this Fixing Model Rotation guide.
Warning: Maintain a vehicle scale of [1,1,1]. Adjust the vehicle scale using the model import settings in Unity or 3D software prior to setup.
Physics Settings
- For PC games, it is recommended to change the
Fixed Timestep(Edit > Project Settings > Time) from the default 0.02 (50Hz) to 0.01667 (60Hz), 0.01 (100Hz), or even 0.00833 (120Hz) for smoother physics behavior. For mobile devices, set this value between 0.02 and a maximum of 0.03 (33Hz), but note that this may result in lower physics quality. - All NWH assets use only SI units (kg, m, N, etc.).
Automatic Setup
Using the Setup Wizard (Recommended)
The fastest way to set up wheels is using the automated wizard:
- Add your vehicle model to the scene with correct rotation and scale [1,1,1]
- Add a
Rigidbodyto the vehicle root and set the mass (e.g., 1400 for a car) - Add a
Colliderto the vehicle (the Rigidbody requires this to function) - Attach
WheelControllerSetupWizardto the vehicle root - Assign your wheel meshes to the wizard's wheel slots
- Click Auto-Setup and follow the console output
- For standalone use, add the
CarControllercomponent to control the vehicle
The wizard will automatically create WheelController objects, position them correctly, and configure basic settings.
Manual Setup
Step 1: Rigidbody and Collider
- Add a
Rigidbodycomponent to the vehicle root object - Set the mass to a reasonable value (e.g., 1400 for a standard car)
- Add a
Collider(BoxCollider,MeshCollider, etc.) to the vehicle body
Step 2: Create WheelController Objects
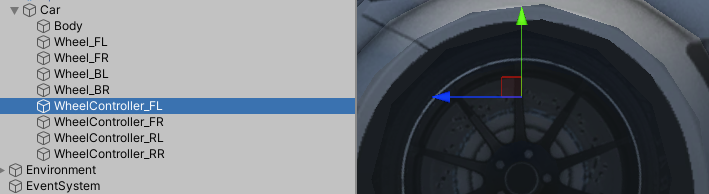
WheelController components must be attached to GameObjects positioned at the suspension anchor points (where the spring begins), not on the wheel meshes themselves.
- Create an empty GameObject for each wheel (or duplicate your wheel meshes and remove all components except Transform)
- Position these objects above the wheel center - this position represents the top of the suspension travel
- The easiest approach: duplicate your wheel meshes, name them "WheelController_FL", "WheelController_FR", etc., remove all components except Transform, and move them up slightly
Step 3: Add WheelController Components
- Attach a
WheelControllercomponent to each GameObject created in Step 2 - The component will automatically:
- Set
Target Rigidbodyto the vehicle's Rigidbody - Create child containers:
RotatingandNonRotating - Initialize with default values
- Set
- Verify the
Target Rigidbodyfield is correctly assigned
Step 4: Parent Wheel Meshes
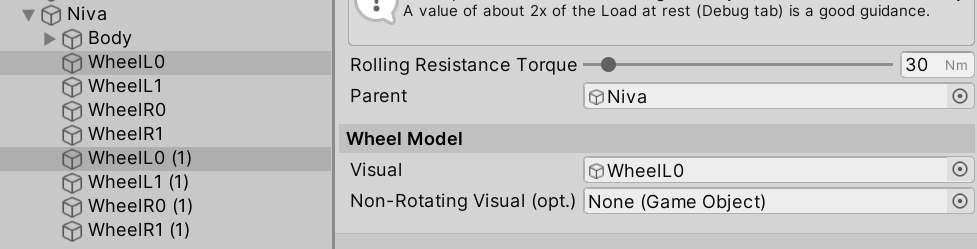
- For each WheelController, parent your visual wheel mesh to the automatically created Rotating container child
- If you have brake calipers or other non-rotating parts, parent them to the NonRotating container
- Ensure wheel meshes have Unity-correct rotation (Z-forward) and centered pivots
Step 5: Configure Wheel Dimensions
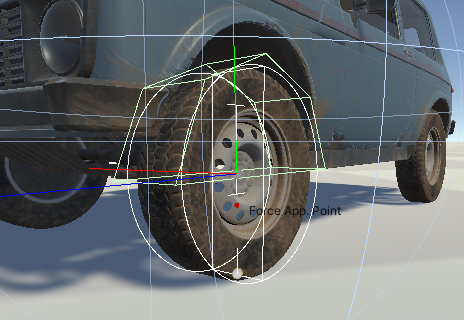
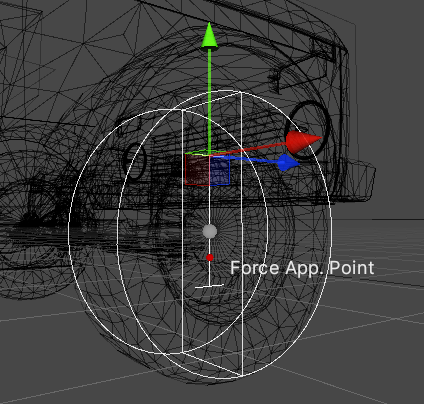
- Enable Gizmos (top-right of Scene view)
- Select each WheelController - you'll see wheel and suspension gizmos
- Adjust
RadiusandWidthuntil the cyan wheel gizmo matches your wheel mesh
Step 6: Adjust Suspension
- Press Play - the vehicle suspension should now be functional
- If the ride height is too high/low:
- Don't change
Spring > Max Length(unless you need more travel) - Do move the WheelController GameObject up (to lower ride height) or down (to raise it)
- The white "I" gizmo shows the full suspension travel range
- Don't change
- Adjust
Spring > Max Forceso the suspension rests at ~30% compression (check Debug tab in play mode)
Step 7: Add Vehicle Control (Standalone Only)
If using WheelController without NWH Vehicle Physics:
- Add the
CarControllercomponent to your vehicle root - The wheels will be found automatically
- Configure which wheels steer, are powered, and use handbrake:
Steer: Enable for front wheels (or all for 4-wheel steering)Powered: Enable for driven wheels (front for FWD, rear for RWD, all for AWD)Handbrake: Enable for rear wheels typically
- Configure input (the CarController uses Unity's Input Manager by default)
Info: If using WheelController as part of NWH Vehicle Physics, skip CarController and add
VehicleControllerinstead. See Vehicle Physics documentation.
Fine-Tuning
Suspension Tuning
For detailed suspension setup, see WheelController Setup. Key adjustments:
- Spring Max Force: Adjust so suspension rests at 20-40% compression
- Damper Bump/Rebound: Control suspension stiffness (start with 5-20% of Max Force)
- Spring Progressiveness: 1.0 = linear, <1.0 = softer when compressed, >1.0 = stiffer when compressed
Friction Presets
WheelController uses FrictionPreset ScriptableObjects for tire behavior:
- The default preset is suitable for dry asphalt
- To create custom presets: Right-click in Project > Create > NWH > WheelController3D > Friction Preset
- Adjust Pacejka BCDE parameters to tune tire grip characteristics
- Assign different presets to different wheels (e.g., lower grip on rear for oversteer)
For details, see FrictionPreset documentation.
Center of Mass
If the collider is small or offset, use VariableCenterOfMass to adjust vehicle balance:
- Add
VariableCenterOfMassto the vehicle root - Lower the center of mass (Y value) to reduce body roll
- Move forward/backward (Z value) to adjust understeer/oversteer balance
- Target inertia for typical cars: [700, 1400, 400] or higher
Info: For Unity 2023 and newer, you can adjust center of mass and inertia directly on the Rigidbody component.
Troubleshooting
- Vehicle jitters or jumps: Check that Rigidbody has reasonable mass (800-2000 for cars) and at least one Collider is present
- Wheels sink into ground: Move WheelController objects upward to increase ride height
- Suspension bottoms out: Increase
Spring > Max Forceor use longerSpring > Max Length - Vehicle feels floaty: Increase damper values (Bump and Rebound rates)
- Wheels don't rotate: Ensure wheel meshes are parented to the
Rotatingcontainer, not directly to WheelController
For more troubleshooting, see the WheelController Setup page.
Assembly Definitions
This asset uses Assembly Definition (.asmdef) files. There are many benefits to assembly definitions but a downside is that the whole project needs to use them or they should not be used at all.
- If the project already uses assembly definitions, add a reference to
NWH.WheelController3Din your project's .asmdef file - If the project does not use assembly definitions, simply remove all the .asmdef files from the asset after import
Next Steps
- Read the full WheelController documentation for detailed explanations of all settings
- Check the FrictionPreset documentation page to understand tire physics
- For integration with NWH Vehicle Physics, see Vehicle Physics documentation
- Import and examine the included samples (Package Manager > Wheel Controller 3D > Samples)