Supported Water Assets
WaterDataProvider scripts are interfaces between the 3rd party water
assets and Dynamic Water Physics 2. They tell the WaterObject where the
water is.
Using Multiple Assets / Water Types at Once
Multiple water types can be used in the same scene at the same time.
This is achieved through triggers (Colliders with isTrigger set to
true) attached to the same GameObject as the WaterDataProvider.
By default these colliders are created automatically on Awake and are
set to cover the whole world. However, it is possible to use a
WaterDataProvider just for a small part of the scene - such as a
lake:
- Attach a
Colliderof any type (e.g.SphereCollider) to theGameObjectcontainingWaterDataProvider. - Tick
Is Triggeron the collider. - Adjust the size/radius of the collider to cover the area you want the
WaterDataProviderto have the effect on.
If there are multiple trigger volumes they will act as a queue, meaning the one that the object last entered will be currently active.
Flat Water Integration
FlatWaterDataProvider can be used for all flat water systems.
It can even be used with wavy water systems if the waves have 0
amplitude to improve performance - sometimes drastically as the water
heights are always queried with wavy water system, even if there are no
waves.
- Add
FlatWaterDataProviderto anyGameObjectin the scene. WaterObjects will now float at the watertransform.yposition.
Unity HDRP Water
Unity HDRP Water requires HDRP rendering pipeline (will not work with URP).
- Import the
Unity HDRP Water Integrationsample from the Package Manager. - Add
UnityHDRPWaterDataProviderto anyGameObjectin the scene.
Crest
Dynamic Water Physics 2 supports Crest 5+ (WaveHarmonic.Crest) by default. Crest supports water heights, normals and flows.
Important
Crest Water 5 requires the separate Crest Water 5 - CPU Queries package to be installed alongside the main Crest Water 5 package. DWP2 uses the CPU query API to sample water heights, normals, and flows.
- Import the
Crest Integrationsample from the Package Manager. - Add
CrestWaterDataProviderto anyGameObjectin the scene.
Tip
The Crest Integration sample includes a ready-to-use demo scene: CrestIntegrationDemo.unity.
Legacy Crest Support
For older Crest versions (pre-Crest 5) that use the Crest namespace instead of WaveHarmonic.Crest, add the DWP_CREST_LEGACY scripting define symbol to your project:
- Go to Edit > Project Settings > Player.
- Under Scripting Define Symbols, add
DWP_CREST_LEGACY. - Click Apply.
Stylized Water 3
Stylized Water 3 supports water heights, normals and flows.
- Import the
Stylized Water 3 Integrationsample from the Package Manager. - Add
StylizedWater3WaterDataProviderto anyGameObjectin the scene. - Assign the wave profile.
KWS
KWS Water System supports water heights, normals and flows.
- Import the
KWS Integrationsample from the Package Manager. - Add
KWSWaterDataProviderto anyGameObjectin the scene.
Tip
The KWS Integration sample includes a ready-to-use demo scene: KWSIntegrationDemo.unity.
R.A.M. (River Auto Material)

R.A.M. (River Auto Material) supports water heights, normals and flow via RaycastWaterDataProvider.
- Import the
RAM Integrationsample from the Package Manager. - Set up the scene as if using flat water, minus FlatWaterDataProvider.
- Add
RAMWaterDataProviderto anyGameObjectin the scene. - Make sure that the RAM object has a MeshCollider attached. This is required for Raycasts to work.
- Assign Water Layer to the River Auto Material water. Assign Object Layer to all the WaterObjects in the scene. This is an important step as the script will disable physical collisions between the two layers to prevent the WaterObjects from sitting on top of the mesh collider that R.A.M. uses instead of interacting with water.
- R.A.M. setup is ready to go.
Stylized Water 2
Stylized Water 2 includes its own DWP2 integration.
- Go to Help > Stylized Water 2 and click Install integration.
- Add
StylizedWaterDataProviderto anyGameObjectin the scene.
LUX Water
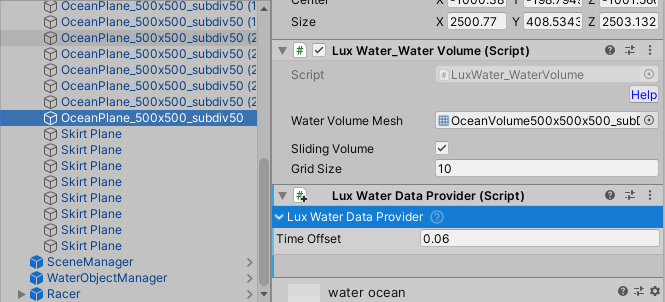
Lux Water supports water heights.
- Import the
Lux Water Integrationsample from the Package Manager. - Add
LuxWaterDataProviderto anyGameObjectin the scene.
Ceto
- Support removed in v14
Ocean Next Gen
- Support removed in v14
SUIMONO
- Support removed in v14